
BLOG
Early Season Tune-Up Deal!

If you drop your bike off for a tune-up this weekend — March 9 or 10 — you’ll receive 10 bucks off!
We have several different tune-up levels, and we promise to be super-honest about which one would be of the most value for you.
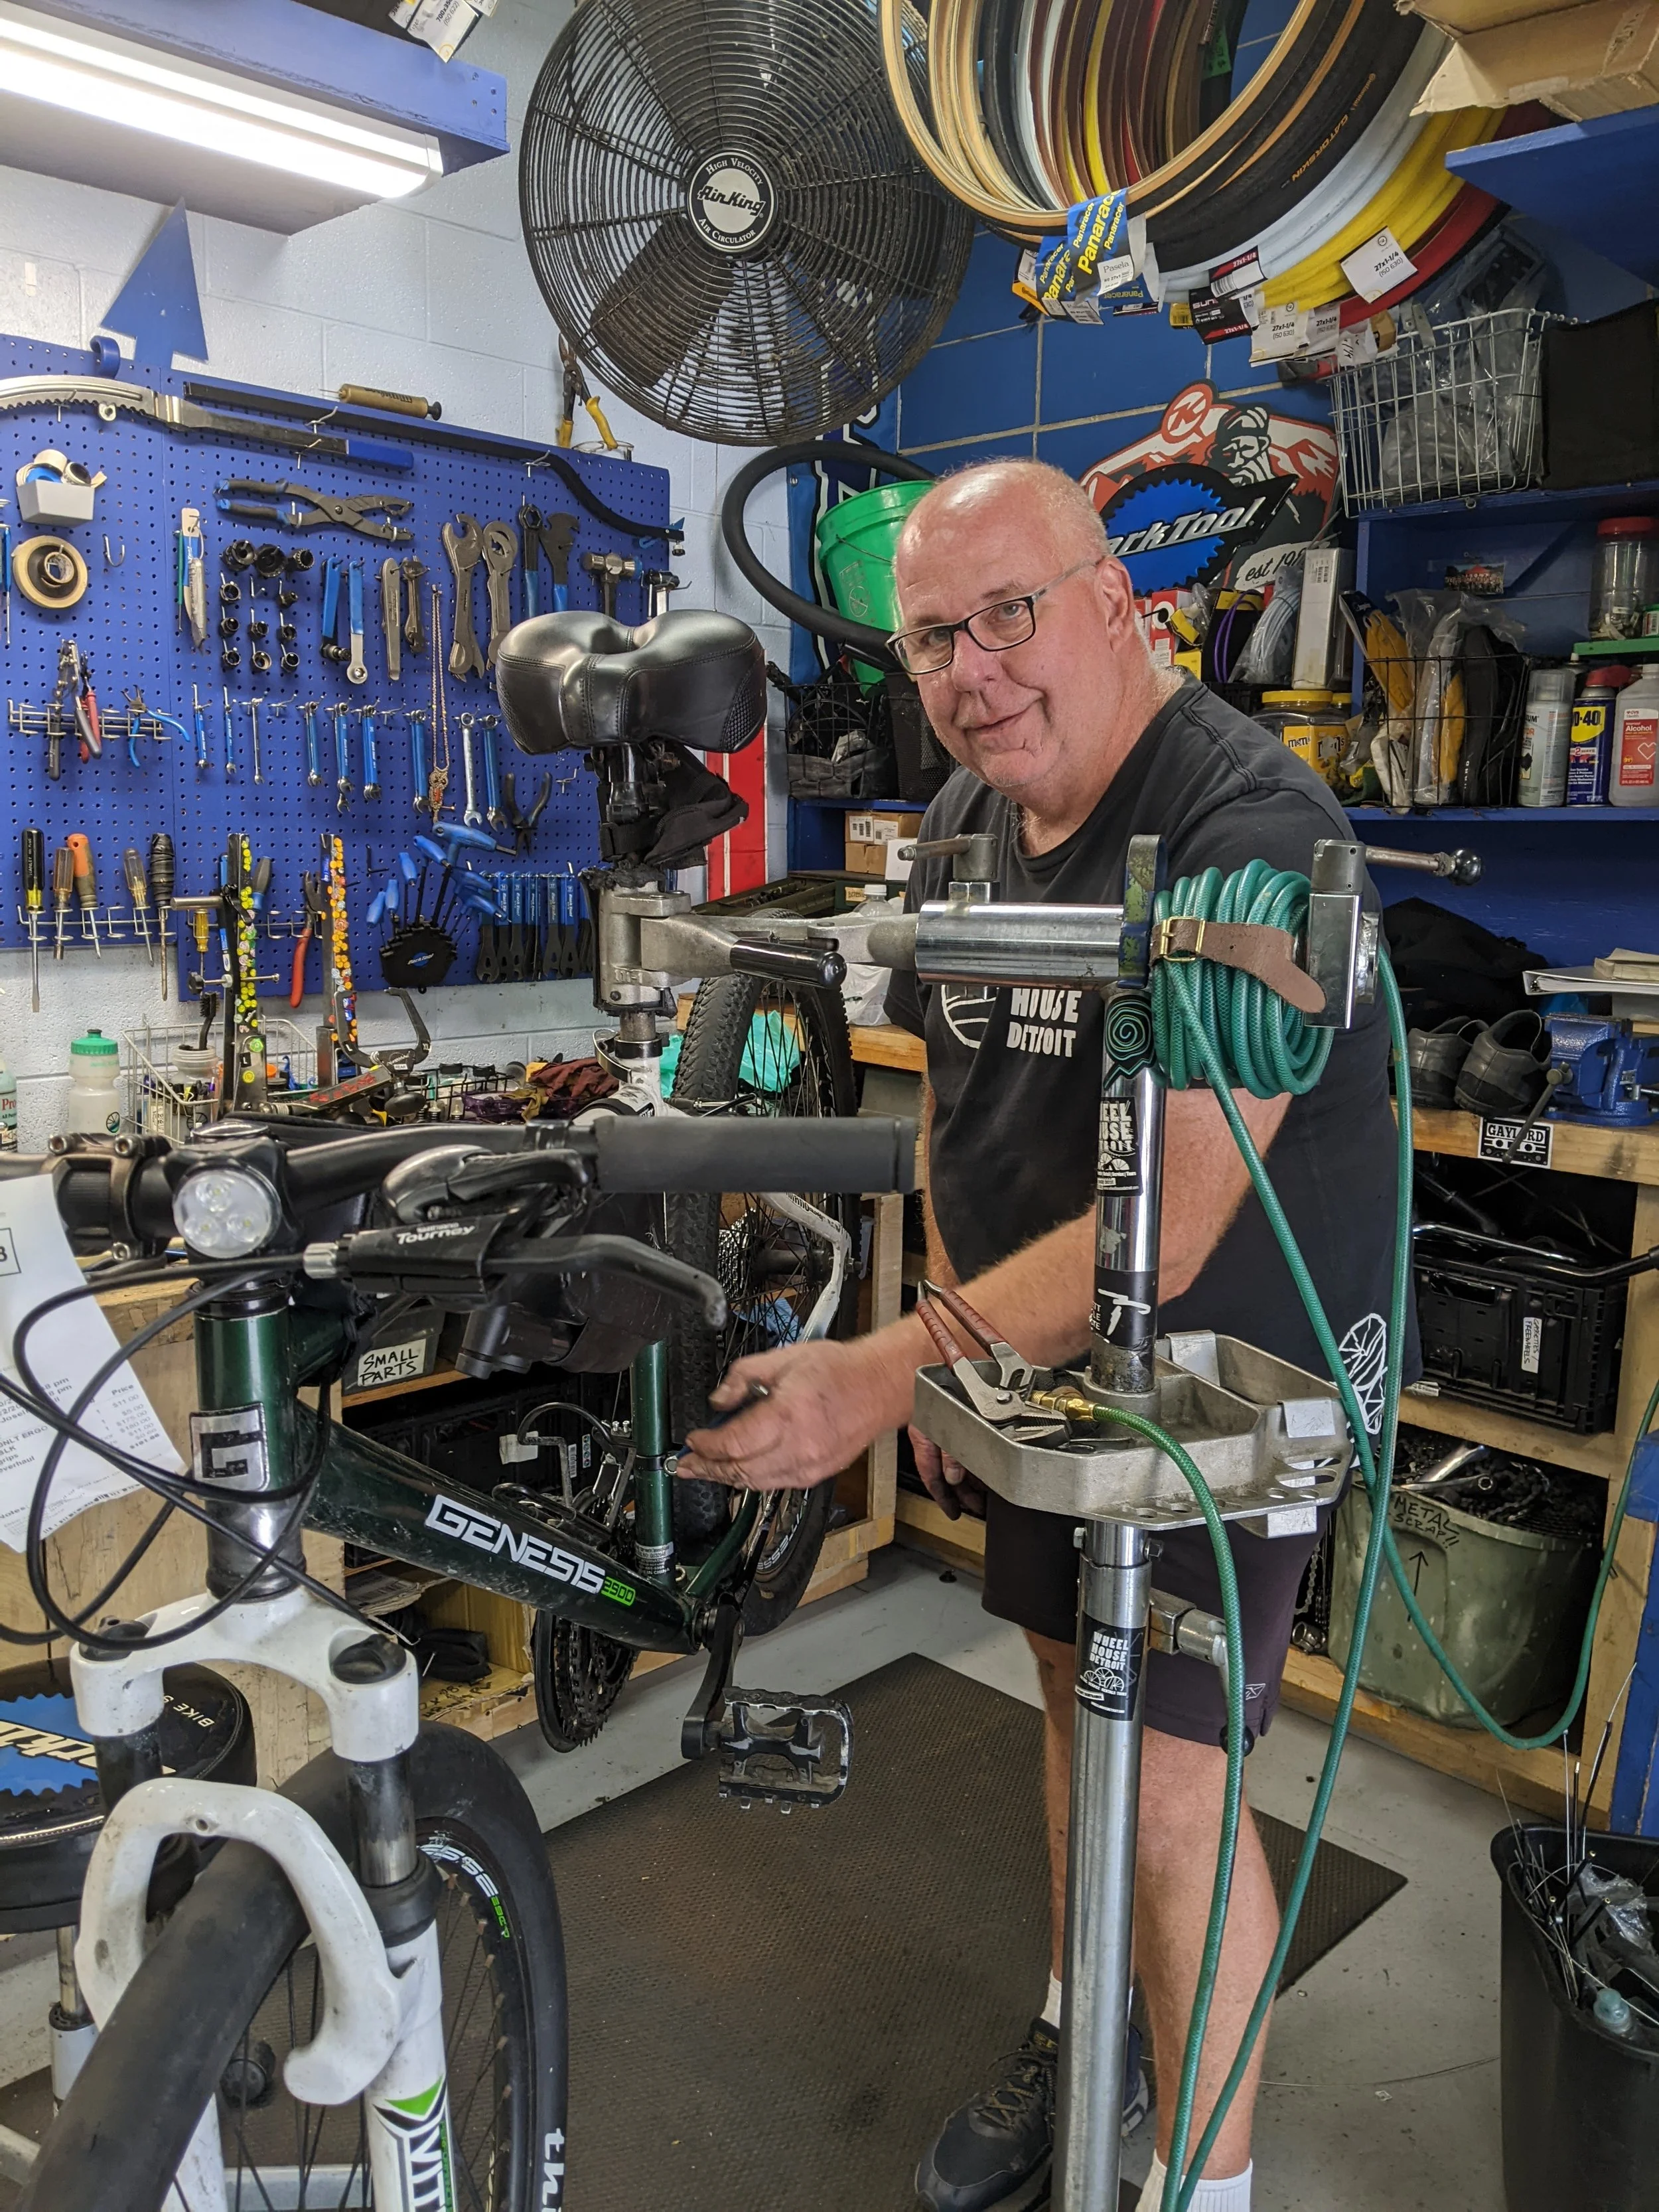
Most people will just need our Standard Tune-Up, which is typically $75. We adjust brakes, gears, and derailleur; perform a minor (on-bike) wheel true; lube and assess chain; check and tighten crank and headset; and wipe down the frame and wheels.
If your bike is single-speed, the cost is $50; for trikes and tandems, $100.
We also offer a Tune-Up Plus (typically $145) which adds in a full (off-bike) wheel true; cleaning of the bottom bracket and both derailleurs; new cables, housing, and brake pads.
Finally, a Total Overhaul is a Tune-Up Plus as well as a bearing overhaul — usually it’s $175.
We’re open Saturday and Sunday 11AM-4PM — so bring your bike in to get it all ready for Spring and save a Hamilton while you’re at it!

2024 Season Is Here! News & Specials

Hi, everyone! Hope your “Winter” went well…
We’ll be opening our doors for Season #17 (we can’t believe it either) on Saturday, March 2. For the first couple of weeks, our schedule will be: Saturdays and Sundays March 2, 3, 9, & 10 11AM to 4PM.
At that point, we’ll look at weather and staffing to set up a schedule for the remainder of March. As always, stay tuned to our website and social media for all the latest.
Now’s a really good time to drop off your bike for its Spring Tune-Up. 75 bucks gets your baby’s brakes, gears, and derailleur adjusted; a minor (on-bike) wheel true; lube; the headset and crank checked and tightened; and a wipe down.
Early season turn-around is quick. Plus, if you drop your bike off for a tune-up during our first two weeks of operation, you’ll get $10 off!
If you’d rather us pick up and deliver your bike to save you a trip, we can do that! The price for this service starts at $20 round-trip (for Greater Downtown) and will begin for the season on March 11. If you email us to schedule on or before March 10, we’ll knock 10 bucks off the delivery fee.
March is the month we will begin to craft our Tours schedule and we’ll publish them as dates get locked in. We expect to return all of our favorites and maybe even debut one or two new offerings. In the meantime, you can book a private tour or group rental while our calendar is still wide open! Early Birds! Weekday (M-Th) private tours booked for April or May will receive $50 off the base price for one to six riders.
Booking inquiries should be made to Linda at bookings@wheelhousedetroit.com.
Can’t wait to see you at the shop! Lots more news to come as we get the season rolling. - Kelli
Service Series: Why Tuneup?
We truly believe that a quality bike shop bike can last a lifetime — with proper maintenance! That’s why we recommend a tune-up every season.
To put it simply, a tune-up checks and adjusts every moving part of your bicycle. Here’s what we get into:
Brakes: Do your brake levers need to be sqeezed more than halfway before the brakes apply? Do they feel “sluggish?” They need adjusting! We do that during a tune-up.
If anything else is not right — like your brake cables &/or housing are frayed or gunked up — we would notice it at this point and let you know if additional service or parts are recommended.
Gears/Drivetrain: Do your gears transition smoothly or do they feel sluggish? Does the chain come off when shifting? Can the bike shift into all the gears? Do you hear any clicks, rattles, or rubs? Yes to any of those questions means you need a gear adjustment! We’ll also tighten your crankarm and lube your chain.
If your cables &/or housing are frayed or gunked up and/or your chain, chain ring &/or cassette are worn, we would notice it at this point and let you know if additional service or parts are recommended.
Wheels: When spokes on a wheel loosen over time, your wheel can become “out of true” causing your brakes to rub and, over time, leading to a total wheel failure. As part of your tune-up, the mechanic will perform a “minor true” meaning they will loosen and tighten spokes while the wheel is still attached to the bicycle.
If a wheel requires adjustment than a minor true, the wheel will need to be removed from the bicycle and placed into a special truing stand. If that additional service is necessary, we would let you know at this point.
Cleaning: While the bike is up in the repair stand, we wipe the frame and wheels down, removing dust and gunk.
If you ride a lot, plan on starting out in Spring with a fresh tune and possibly a second one near the end of summer. The good news is that if you bring it in for that possibly-second-tune, we’ll for sure tell you if it just needs a couple of smaller adjustments and save you some dough. But better safe then sorry.
What say you? “But I haven’t ridden all year!” You, dear friend, need a tune-up for sure. Your poor bike has been accumulating rust and dust, the enemies of smooth shifting and safe braking. Let us get her back into dependable riding shape.
Standard tune-ups cost $75; we adjust brakes, gears + derailleur; perform a minor (on-bike) wheel true; lube and check chain; check and tighten crank & headset; and wipe down the frame and wheels. If your bike needs more or less love than that, we are very honest and transparent about what needs to be done.
Early and peak season, the turn-around on tune-ups can be a week or more. Late in the season, we can usualy turn one around by the next day.
Service Series: Using an Air Pump
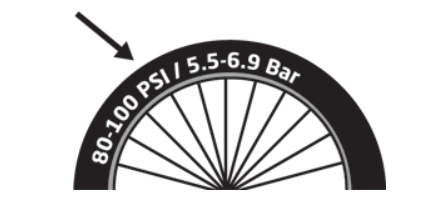
The very best way to prevent flats is by keeping your tires properly inflated, which we covered in the very first installment of our Service Series. But now you’ve gotta pump your tires up to their proper PSI.
If you don’t know how to properly use an air pump, you are not alone. Keep reading for a step-by-step instructional and GET PUMPED!


If you’re a video learner, this one from Park Tools is helpful. Please note you will more-than-likely be using the consumer head type of lever that they reference. In fact, the pump used in this video is the very one we have to loan out at the shop!
Service Series: Frame Size
Instead of riding around like Deebo, we want to help you make sure you’re selecting a bike that fits you!
One issue we’re seeing is that a lot of internet bicycle companies use height to guide customers when selecting a bicycle. We find that inseam (or leg length) is a much more important measurement. Two people of the same height with different inseams (ie long legs/short torso vs. short legs/long torso) can ride different-size frames!
The easiest way to make sure your frame is properly sized is to stand over the top bar. You should have about 2 fingers-width between you and the frame.
Step-through frames are different, since the top bar of the frame triangle is angled downwards. In this case, you’ll want to focus more on how comfortable your “lean” towards the handlebars is rather then the height of the frame.
When we’re working with you on picking out a new bike, the frame size is the most important part. Think of it this way: when it comes down to it, anything except the frame can be changed on a bike! The frame is essentially the bike and you want to be 100% certain of its fit.

Just one more reason to Buy Where You Ride! Come by for a test ride of one of the awesome new bikes we have for sale and we’ll make sure you are comfortable and satisfied.
If you want to get real nerdy on frame size, check this out. Rabbit hole alert!
Service Series: Saddle Height

One of the simplest adjustments to be made on a bicycle is to the height of the saddle. To be frank, Detroit, many of you are riding around with saddles that are waaaay too low!
From adjusting rental saddles dozens of times a day, we know that there are lots of people who feel safer with the saddle too low, as their feet can touch flat on the ground that way.
We encourage you to take some time riding around with it higher — your foot will come to the ground on a mellow tiptoe — and your knees and back will thank you! Plus, you get a more efficient “stroke,” which will make your ride that much easier.
Simply put, on the downstroke your knee should be slightly bent. Not fully extended — in that case, your saddle is too high.
If you have a quick release seatpost clamp, you can raise and lower your seat without a tool. If not, you’ll need a hex wrench (probably a 4, 5, or 6mm). As always, feel free to swing by the shop for advice and guidance!
Service Series: Flat-Fixing 101

Don’t let a flat be a ride-ender! Changing a flat isn’t that tough. We’ve created this 3-part series to help you be able to help yourself.
Part 2: Basics to Have on Hand (er, Bike)
Part 3: Let’s Do the Dang Thing!
If you prefer the hands-off model of bicycle maintenance, we got you! A flat change is $12 + cost of the tube (usually $8-10). We can typically do it while you wait or take a stroll on the Riverwalk.
Flat Fixing, Part 3 of 3: Let's Do the Dang Thing!
Now that you have the proper-size tube and the necessary tools, we’re going to jump in, get our hands dirty, and Change. That. Flat!
First, you’ll need to remove the wheel from the frame. We are actually going to devote an entire blog post soon about wheel removal but, for now, the experts over at Park Tool have a great how-to video HERE.
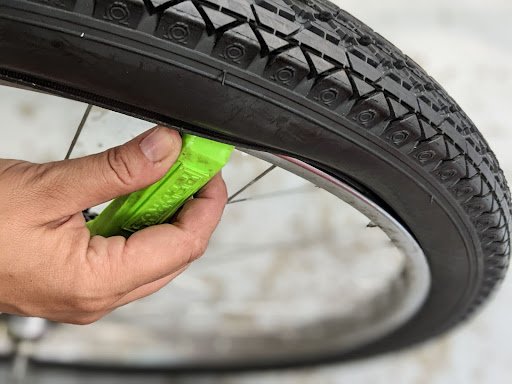
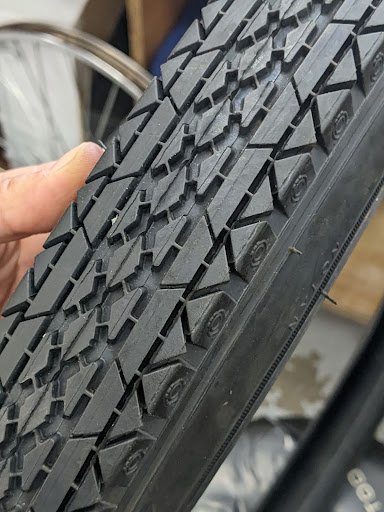
Remove the tire from the wheel. Use tire levers, if necessary.
Remove the tube from the tire and set the tire down; pull the tube out of the tire with the valve lined up with the top center of the tire - this will help you locate shrapnel in the tire, if any, later!

Inflate the problem tube and do your best to locate the puncture. Once you find the puncture, line it up with where that part of the tube was on the tire - do you see any glass or tiny wires in the tread? If so, remove the shrapnel.
Bike Shop Pro Tip: Take your fingers and gently feel the inside of the tire throughout the entire diameter of the tire. This will help you detect small wires and shards of glass you may not see on the outside tread or outside of your initial puncture location! Also, take this opportunity to inspect the steel bead and sidewalls of the tire, along with the outside tread, looking for any damage.
If the tube looks like it has a snake bite and you cannot locate anything stuck in the tire that may have caused it, you’re not crazy - it was likely caused by low air pressure and the tube got pinched between the bead of the tire and the rim (more common than you think)!
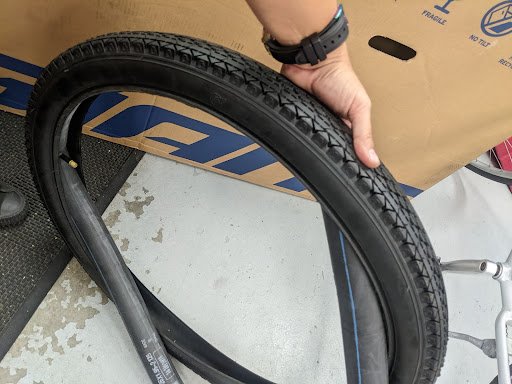

Take your new tube and add some air to give it some shape. 10 PSI should do ya. Place the tube inside the tire, lining the valve up with your P.S.I or the tire label is a bonus. (This will help you find flat-causers in the future, a la Step 2!)
Put the tire (with the slightly inflated tube snugly inside of it) back onto your wheel, one side at a time. Here’s where those tire levers come in handy again.
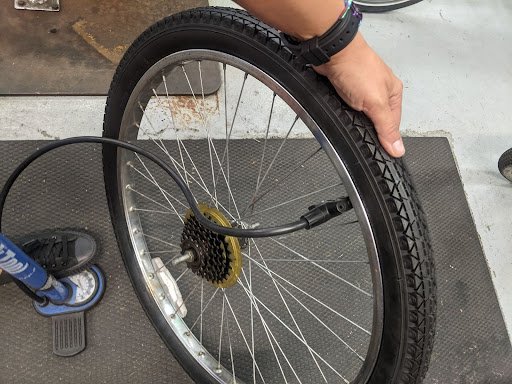
Attach your pump to your valve and slowly start inflating your tire to make sure your tube isn't trying to sneak out between the tire bead and the rim. (Putting the tube inside of the tire is usually very helpful in preventing this, which is why we mentinoed it!)
Once you’ve pumped about 25 PSI into the tire with no bulging, it’s safe to say that you’re good to go and you can inflate the tire to its maximum capacity.
Now put the wheel back into the frame and you’re ready to roll!
Flat Fixing, Part 2 of 3: Basics to Have on Hand (er, Bike)
If you’re going to fix your own flat, you need to be equipped.
Number 1, you need a replacement tube. Our last blog post was all about how to make sure you had the correct size.
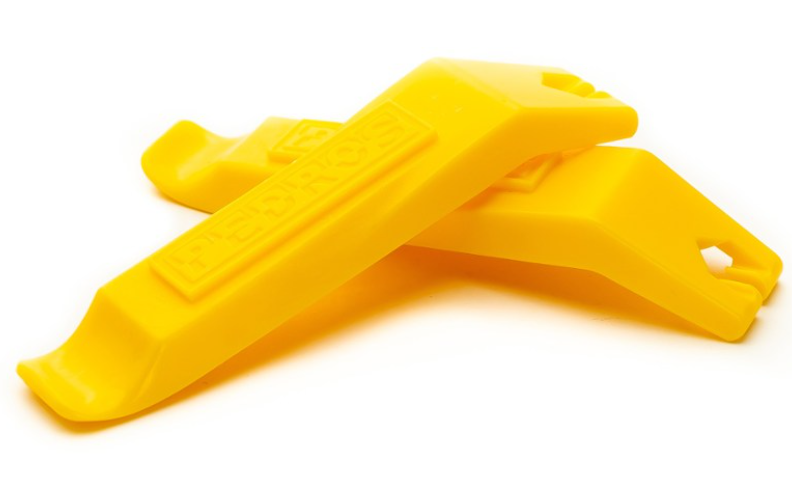
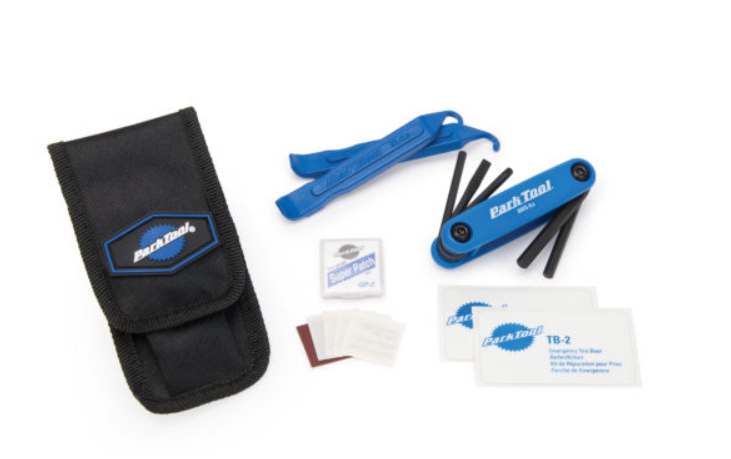
Then you need some basic tools. Tire levers are mandatory (pictured: Pedro’s $5.25). The middle pic above shows the contents of a basic Park Tool Essential Tool Kit. It’s $27 and includes tire levers, a hex wrench set, a tube patch kit, and tire boots (more on those another day). Comes with a handy-dandy pouch.
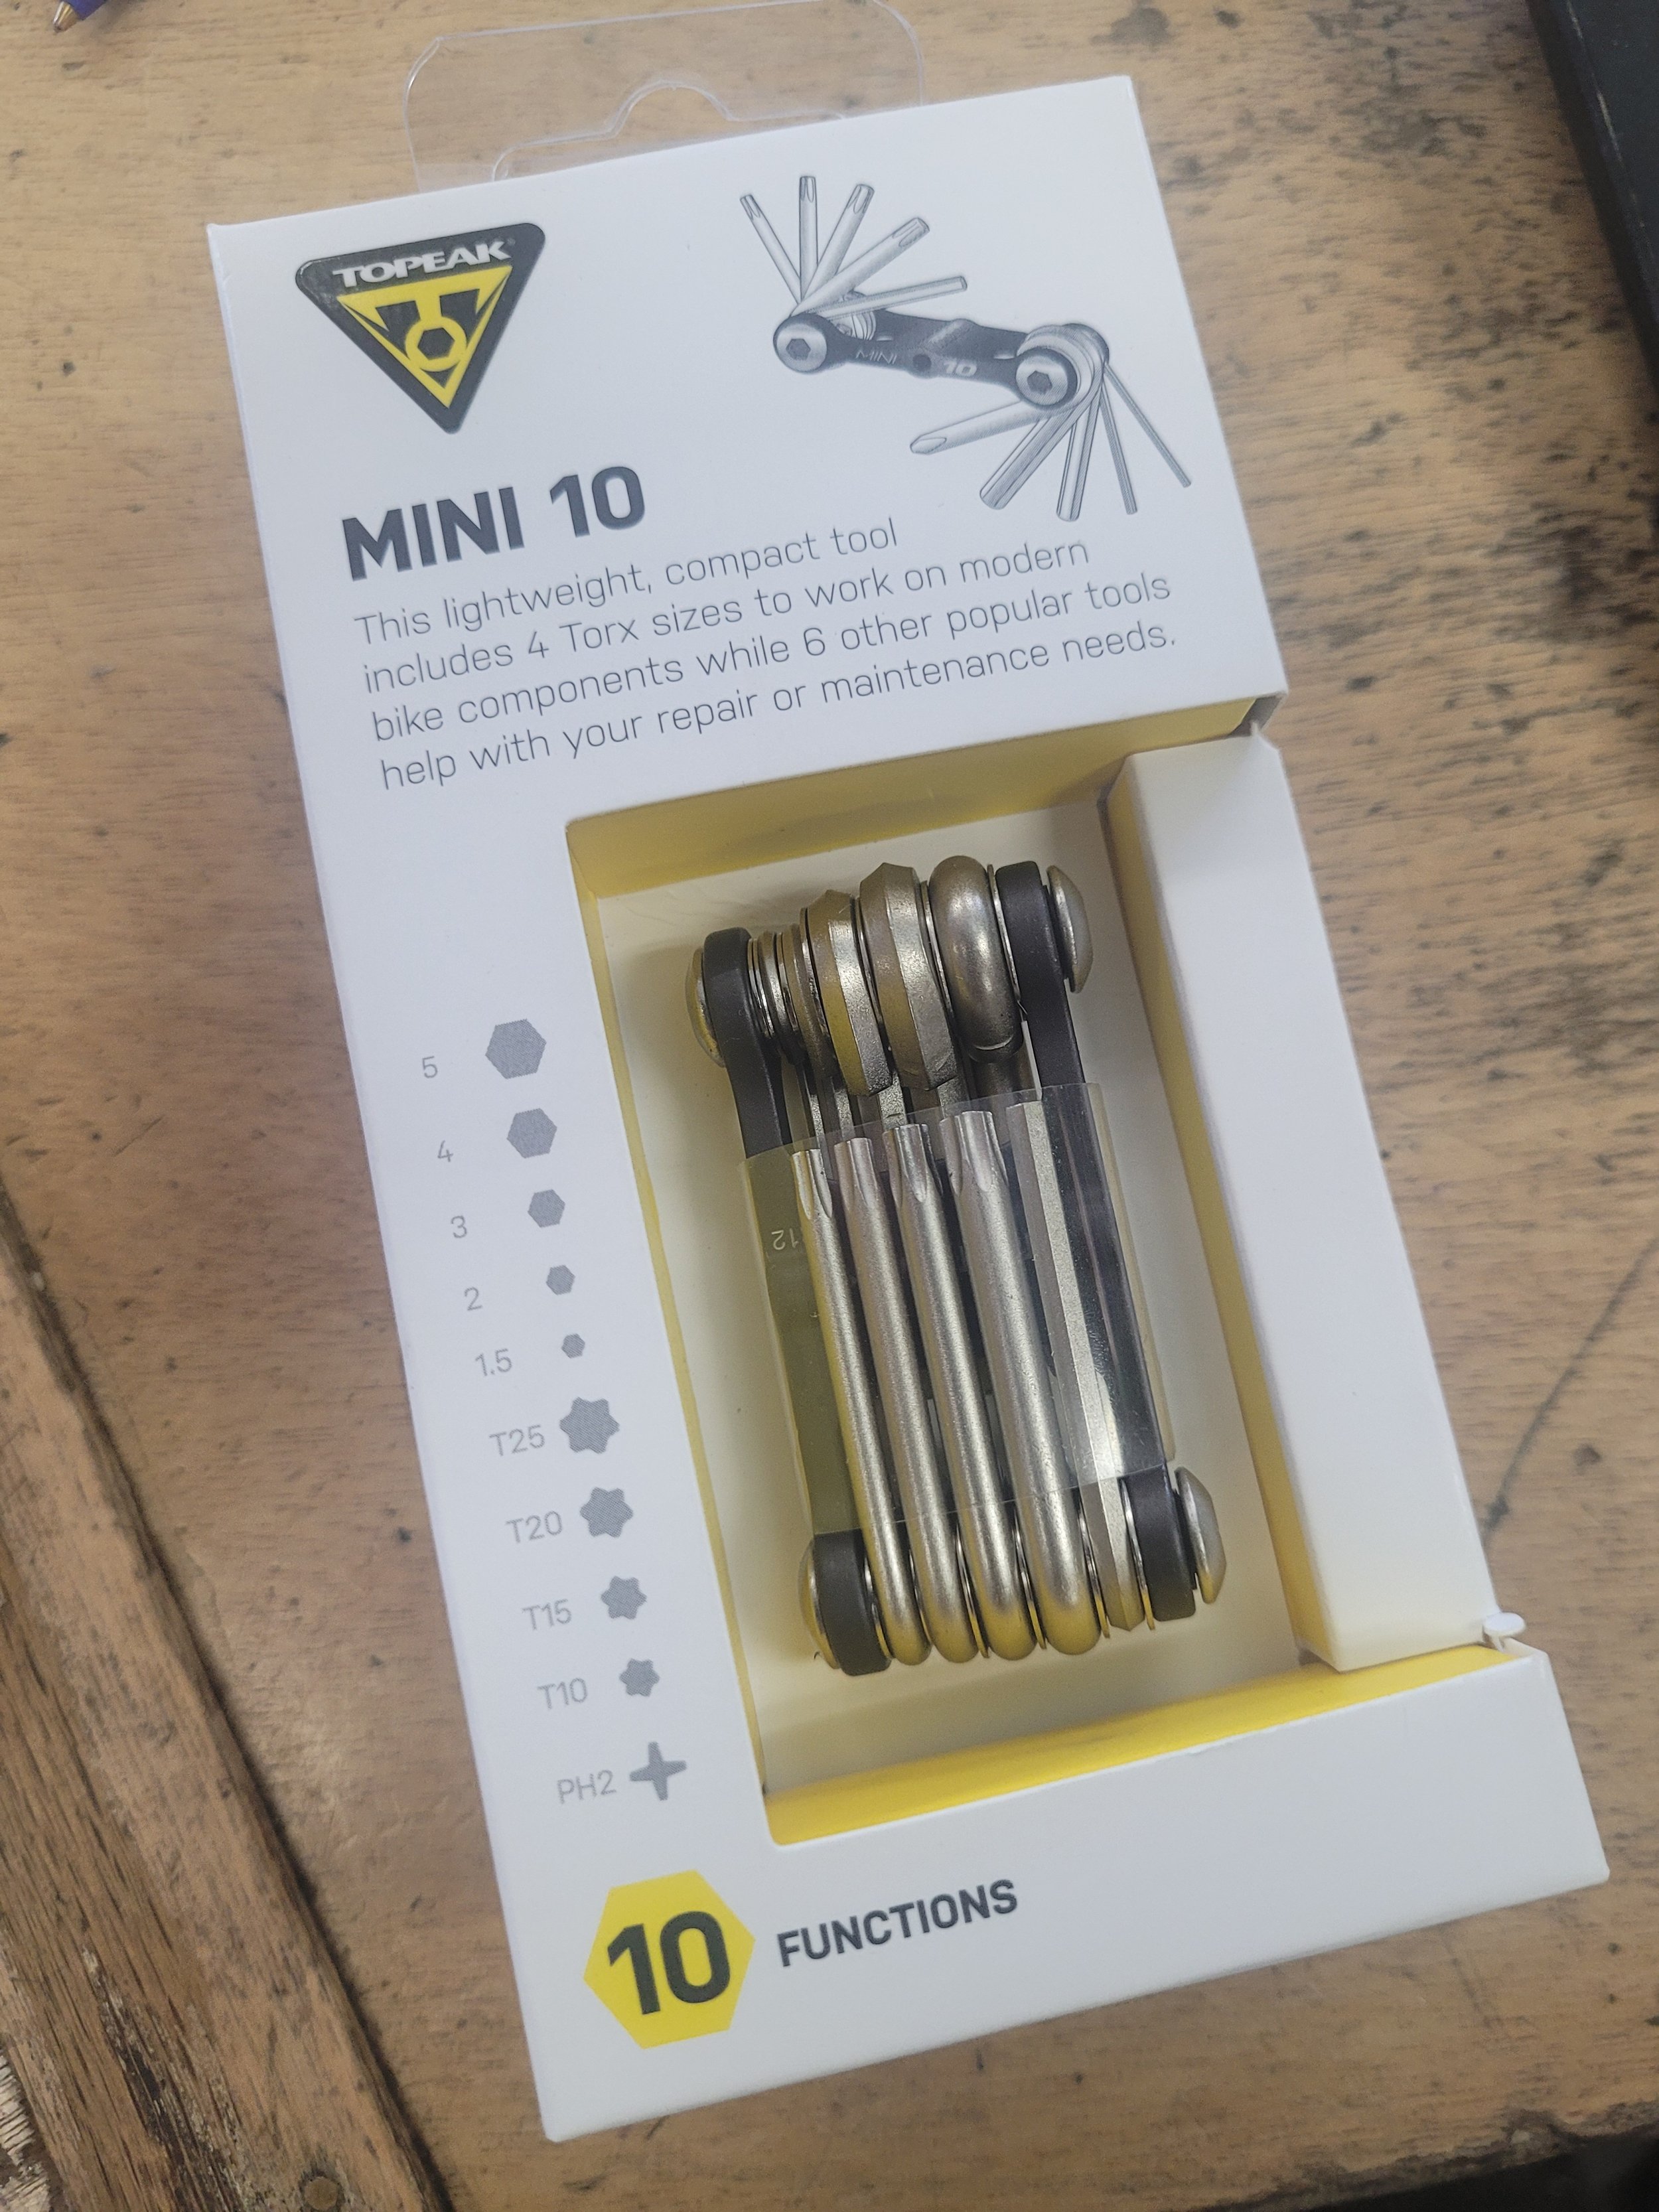
Multi-tools are also a sound investment. They add other useful tools (like a Phillips head screwdriver) to the hex wrench set. The Topeak Mini 10 retails for $22.
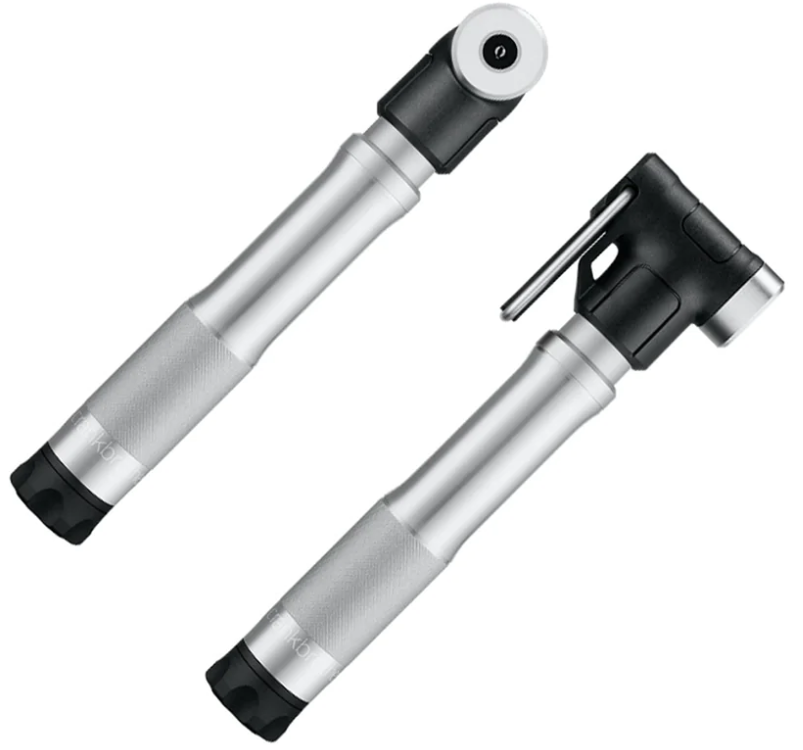
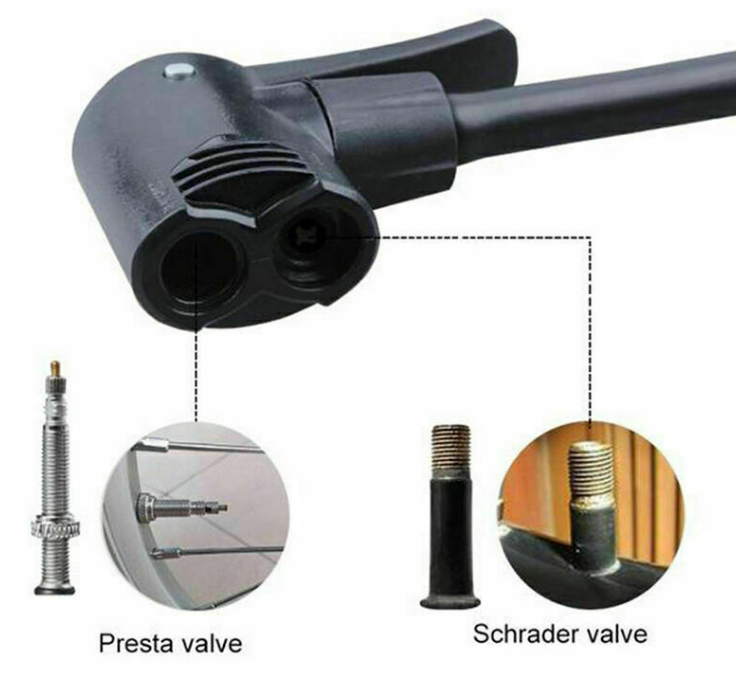
Next you’ll need an air source. When selecting a frame or portable pump, consider size, if you want a gauge (that will cost more), and if you need Schraeder and/or Presta. The Crank Bros Short Frame pump ($23) doesn’t have a gauge, but it’s suprisingly powerful for its size and does accomodate both SV and PV tubes.
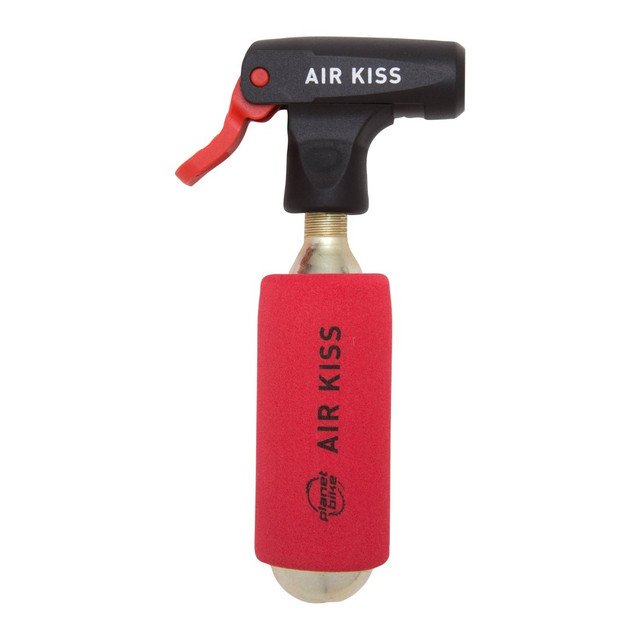
Another option to consider is a CO2 cartridge setup. Pros: it doesn’t break, it’s very compact, and it requires less human effort to actually fill the tire. Cons: you have one shot (or, as many shots as cartridges you carry) and there is a possibility for a blowout (ie, overinflation that ends with a bang!). The Planet Bike CO2 Kiss is $13 and includes the dispenser and one cartridge. Replacement/spare cartridges are about 3 bucks a piece.
Many avid riders carry both; as you get more comfortable changing flats, you’ll learn what works for you.
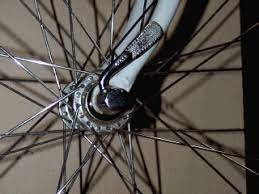
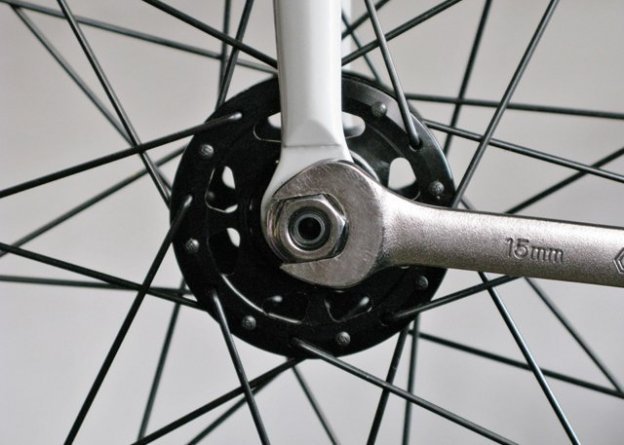
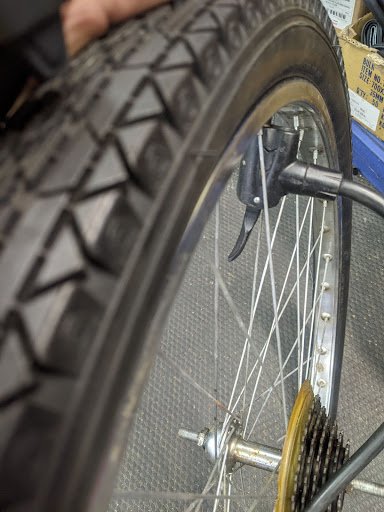
Lastly, if you have bolt-on wheels, you’ll need a wrench (most likely a 15mm). The wheel on the left is quick release, which can be removed by hand. The wheel on the right is bolt-on which, yes is one more step for you, but it’s also one more step for thieves.
So now that you have everything you need, we’re ready for the most important step: Changing your flat! Coming up in Part 3.
Flat Fixing, Part 1 of 3: Know Your Tube

In just 3 short blog posts, we’re gonna show you how to change a flat tire! It’s not that difficult, and it is an invaluable tool for every cyclist to know.
First things first, you need to have a spare tube with you when you ride. And you’ll want the right size tube!
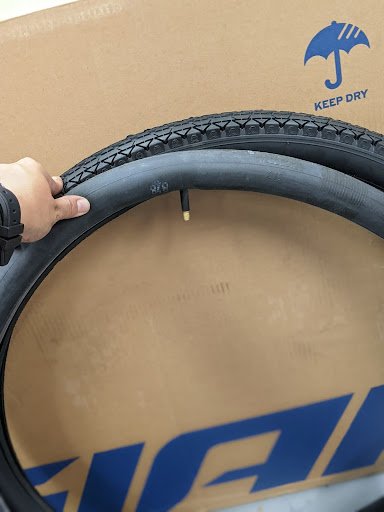
The very first blog post of our Service Series was about learning the proper inflation of your tube and tire, also known as PSI. The same place where you find your PSI, on the side of the tire, is where you find the size of your tire and tube.
The sizes of tubes and tires is waaaay more complicated than it should be. Some are measured in British, some in Imperial (US). There are literally dozens of tube sizes that we stock in the shop although some are certainly more common than others. But none of this matters if you can just read the size off the side of the tire!
There will be 2 numbers linked by an “X”. That’s all you need.
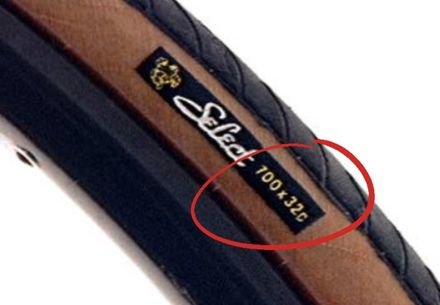
So, the tire on the left is 700 millimeters in diameter and 32mm wide and is referred to as a “700 by 32.” (You can ignore the “c,” it’s a holdover from an old French measurement system and isn’t used at all anymore. It doesn’t mean centimeters. Yeah, tubes and tires are unecessarily complex.)
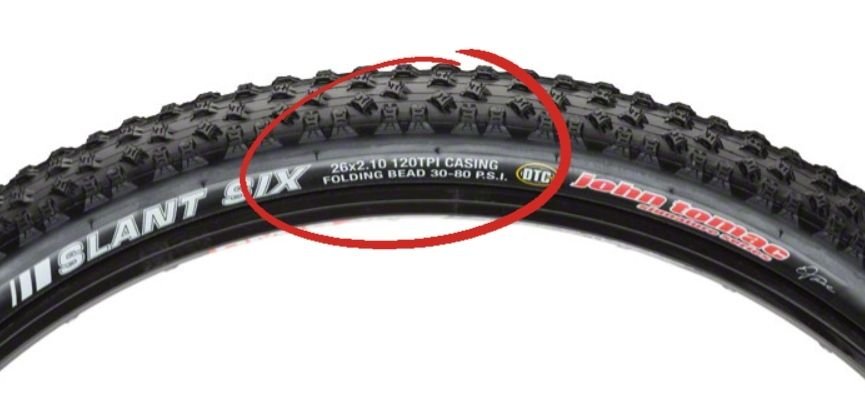
The tire on the right is 26 inches in diameter and 2.1in wide and is referred to as a “26 by 2.1.”
Pro tip: If you don’t have your bike with you at the shop and don’t want to deal with this nomenclature, you can always just take a pic of the numbers on your phone and show one of us.
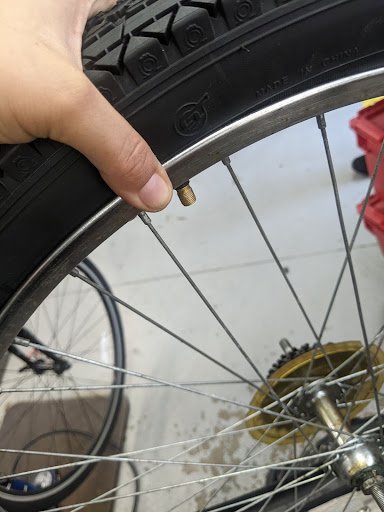
Next up, you’ll need to know what kind of valve you have.


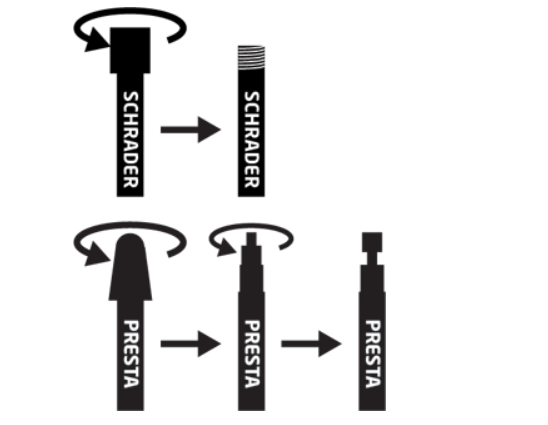
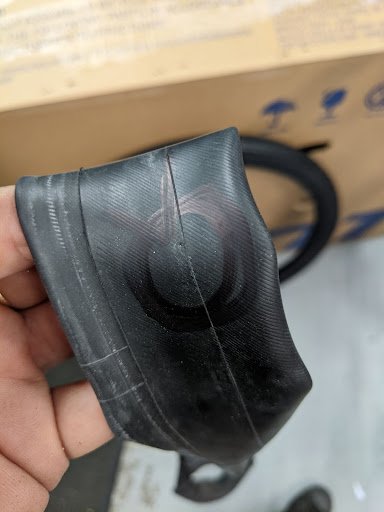
The tube on the left has a Schrader valve, or SV. The tube on the right has a Presta valve, or PV.
So now you can walk confidently into the shop and say, “I need a 26x2.1 SV tube!” or “I need a 700x25 PV tube!”
If you’d like to take the next step and stare down those shelves of tubes and select your own, just remember that tube widths are sold in ranges. Basically the tube for your 26x2.1 tire will be 26x1.9-2.125. All you need to make sure is that your diameter (ie, the number before the “X”) matches and that your width (ie, the number after the “X”) fits within the range of numbers on the tube box.

In the photo above, we’ve got a 700x37 tire with a Presta valve. The correct tube is 700x35-43 PV.
One last thing to remember, if you have a Presta valve, there are also different lengths. It’s more than likely that if you are riding a wheel that requires a long Presta valve, you will know that about it, since it’s kind of a high-end thing. But when in doubt, just ask. We are happy to help you figure it out!
Tubes do range in price depending on size, but most are in the $10 range (super skinny and super fat ones tend to cost more).
And if any of this sounds overwhelming, don’t stress. We got you! We can show you how to read the size off your bike or, if you are on a need-to-know basis with bike maintenance, just show us the bike or a photo of the tire and we will grab the proper one for you.